Zebra cakes are a sweet, visually appealing dessert that blends the best of both worlds: a moist, tender cake with a fun, striped design. Whether you’re a seasoned baker or a beginner, this guide will walk you through everything you need to know about these iconic treats. From the essential ingredients and recipe steps to creative variations and expert tips, you’ll be equipped with all the knowledge to make the perfect zebra cake. Plus, we’ll answer some frequently asked questions and share ideas for serving and storing these delicious cakes. So, let’s dive in and discover all that makes zebra cakes so irresistible!
Introduction to Zebra Cakes
What Are Zebra Cakes?
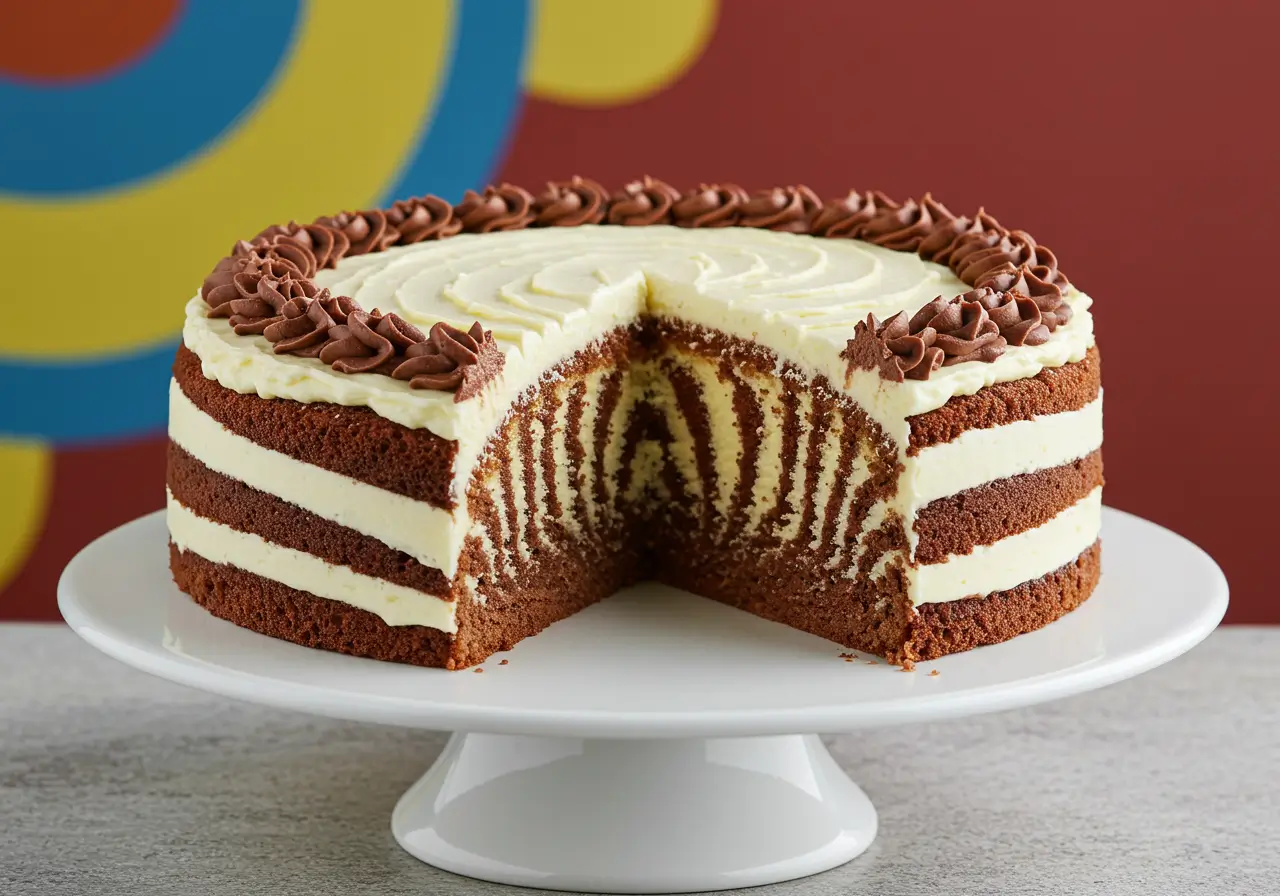
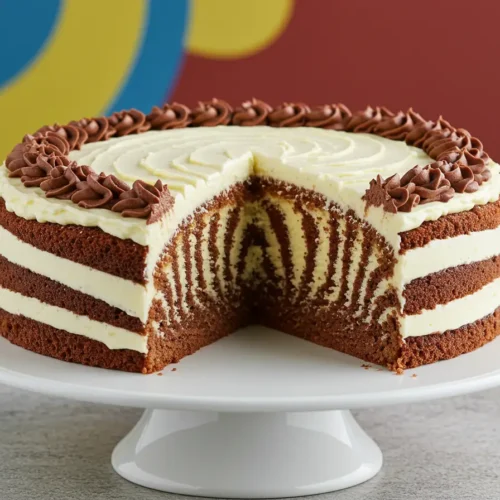
Zebra cakes are a delightful combination of two classic cake flavors: chocolate and vanilla. The defining characteristic of zebra cakes is their striking appearance—a perfect swirl of alternating dark and light stripes, much like the pattern of a zebra’s coat. This design is achieved by layering chocolate and vanilla batter together, creating a visually appealing treat that’s just as delicious as it is beautiful.
These cakes can be made in various forms, from a simple sheet cake to individually-sized snack cakes. No matter how they’re baked, zebra cakes are guaranteed to be a hit at any gathering, offering a satisfying mix of flavors and textures that’s perfect for any occasion. While the original zebra cakes are often made with a boxed cake mix, there are plenty of homemade recipes that allow you to create this fun treat from scratch.
Origins and Popularity
The concept of zebra cakes is rooted in the classic marble cake, which combines chocolate and vanilla batters. While marble cake has been around for centuries, zebra cakes became widely popular thanks to Little Debbie’s version, which was introduced in the 1990s. Little Debbie’s zebra cakes, in particular, captured the attention of cake lovers with their easy-to-eat, portable design, making them a go-to snack for many.
Since then, zebra cakes have evolved into a beloved dessert across the globe. Whether you enjoy them as a dessert, a snack, or as part of a special celebration, zebra cakes are versatile and loved by all ages. In addition to their flavor, the appeal of zebra cakes lies in the creativity and fun of their signature pattern, making them a favorite choice for both novice and expert bakers alike.
Now that we’ve covered the basics, let’s dive into the ingredients that make zebra cakes so irresistible!
Essential Ingredients for Zebra Cakes
Zebra Cake Recipe
Ingredients
- 1 ½ cups all-purpose flour
- 1 ½ teaspoons baking powder
- 1 cup granulated sugar
- 3 large eggs
- ½ cup milk
- ½ cup melted butter
- 2 tablespoons unsweetened cocoa powder for chocolate batter
- 1 teaspoon vanilla extract for vanilla batter
- 1/2 cup sour cream optional for moisture
- 2 cups buttercream frosting or cream cheese frosting
Instructions
- Preheat the oven to 350°F (175°C). Grease and flour two round cake pans.
- In a medium bowl, mix together the dry ingredients: flour, baking powder, and salt.
- In a separate bowl, whisk the eggs, milk, sugar, and melted butter together until smooth.
- Divide the batter into two portions. In one portion, mix in cocoa powder for the chocolate batter. In the other, add vanilla extract for the vanilla batter.
- Drop spoonfuls of alternating batters (chocolate and vanilla) into the center of the cake pan, creating a circular pattern. Continue layering until the pan is filled.
- Bake for 30-35 minutes, or until a toothpick inserted into the center comes out clean.
- Allow the cakes to cool before frosting with buttercream or cream cheese frosting.
Notes
Basic Cake Components
Zebra cakes, like any great dessert, begin with the right ingredients. At the heart of this delicious treat are the basic components: all-purpose flour, granulated sugar, eggs, milk, and baking powder. These ingredients form the foundation of the cake batter. When mixed together, they create a soft, moist cake that can hold the layers of both chocolate and vanilla flavors.
Flour serves as the main structural component, while sugar adds sweetness. Eggs provide moisture and richness, contributing to the tender texture of the cake. Additionally, baking powder helps the cake rise, making it light and fluffy. These ingredients come together to form the base for the two separate batters that will create the signature zebra stripes.
Chocolate Layer Additions
The chocolate layer in zebra cakes is what gives the treat its depth of flavor. Typically, this is achieved by adding unsweetened cocoa powder to one portion of the batter. Cocoa powder brings that rich, chocolatey taste that balances perfectly with the sweetness of the vanilla batter. To make the cake even more decadent, you might find some recipes using sour cream or yogurt to keep the cake moist and add a bit of tang.
In addition to cocoa powder, some recipes include a pinch of vanilla extract to deepen the chocolate flavor and tie it together with the vanilla layer. The result is a flavor profile that’s both familiar and exciting—just like the alternating chocolate and vanilla layers that give zebra cakes their iconic look.
Vanilla Layer Enhancements
For the vanilla layer, simple ingredients like vanilla extract and milk are key. These give the zebra cake its classic, light flavor that pairs beautifully with the rich chocolate. Some recipes use buttermilk or sour cream in the vanilla batter to make it even more moist and tender. The addition of buttermilk not only improves the texture but also brings a slight tang, enhancing the overall flavor of the cake.
This vanilla batter is just as crucial as the chocolate layer. If it’s too dry or bland, the zebra cake will lack the balance of flavors that make this dessert so special. Therefore, you’ll want to make sure the vanilla batter is smooth and creamy to achieve the perfect consistency and texture.
Frosting and Decoration
No zebra cake is complete without a delicious frosting or decoration. Most zebra cakes are topped with a layer of buttercream frosting, which is smooth, sweet, and easy to pipe. For a richer experience, some bakers opt for cream cheese frosting, which adds a tangy twist. You might even drizzle some chocolate ganache over the top for a glossy finish.
The decoration of zebra cakes can also include fun touches like fondant stripes or edible glitter to enhance the cake’s playful and festive appeal. When you cut into the cake, the visual contrast of the light and dark layers is the real showstopper, but the frosting adds a rich finishing touch to the experience.
Step-by-Step Zebra Cake Recipe

Preparing the Cake Batter
Before you start baking, the first step is to prepare the cake batter. Begin by preheating your oven to 350°F (175°C) and greasing your cake pans to ensure that the cake doesn’t stick. In a mixing bowl, whisk together your dry ingredients (flour, baking powder, and salt). In another bowl, combine the wet ingredients (sugar, eggs, milk, and melted butter). Slowly add the wet mixture to the dry ingredients, stirring until you have a smooth batter.
Once your batter is ready, divide it evenly into two bowls. In one bowl, add cocoa powder to make the chocolate batter. In the other bowl, leave the batter plain for the vanilla layer. Stir both batters until smooth.
Creating the Zebra Pattern
The fun part comes when you start creating the signature zebra stripes. To achieve this, spoon alternating dollops of chocolate and vanilla batter into the center of the cake pan. Don’t worry if it looks a little messy at first—this is part of the charm! As you add the batter, it will naturally spread out, forming a circular pattern. You’ll want to keep adding layers until the pan is filled.
The key is to not overmix the batters. Let them spread on their own to create the most distinct zebra stripes. If you mix the batters too much, the pattern will blur, and your cake won’t have those beautiful, contrasting stripes. So, the more you let the batter naturally create the effect, the better.
Baking and Cooling
Place the cake pans in the preheated oven and bake for about 30-35 minutes, or until a toothpick inserted into the center of the cake comes out clean. Keep an eye on the cake as it bakes, but don’t open the oven too often, as this can cause the cake to sink. Once the cakes are done, remove them from the oven and let them cool in the pans for about 10 minutes. After that, transfer them to a wire rack to cool completely.
This cooling period is crucial because it allows the cakes to firm up. If you attempt to frost the cake while it’s still warm, the frosting might melt, creating a mess. Patience is key!
Assembling and Decorating
Now that the cakes have cooled, you’re ready to assemble your zebra cake. If you made a layered cake, carefully level the tops of the cakes with a serrated knife to make them even. Spread a thin layer of frosting between the layers, and then apply a crumb coat to seal in any loose crumbs. Once the crumb coat is set, you can apply the final layer of frosting, making sure it’s smooth and even.
For decoration, feel free to add a drizzle of chocolate or some fondant accents to enhance the zebra theme. If you’re feeling extra creative, use a piping bag to create fun designs on top, like stripes or swirls.
Variations of Zebra Cakes
Rainbow Zebra Cake
If you’re looking to get a little more adventurous, try making a rainbow zebra cake. Instead of just chocolate and vanilla batters, you can divide the batter into multiple portions and add food coloring to each one. Use different colors to create vibrant stripes, giving your zebra cake a fun and colorful twist. This version is perfect for birthday parties, baby showers, or any celebration that calls for a little extra flair.
Eggless Zebra Cake
For those with dietary restrictions or preferences, an eggless zebra cake is a great alternative. You can replace eggs with common substitutes like yogurt, buttermilk, or even a mixture of baking soda and vinegar. These ingredients provide the structure and moisture needed to make the cake soft and airy, ensuring it still has that tender crumb that zebra cakes are known for.
In addition to replacing the eggs, be sure to use an eggless frosting recipe if you want the entire cake to be egg-free. There are many eggless buttercream and cream cheese frosting options available that work beautifully with zebra cakes.
Gluten-Free Zebra Cake
For those who need to avoid gluten, a gluten-free zebra cake is totally doable. Simply swap out the all-purpose flour for a high-quality gluten-free flour blend. Be sure to check the consistency of your batter, as gluten-free flour can sometimes require a little extra moisture. You can also add xanthan gum to help with structure and texture.
Whether you’re baking for a gluten-free friend or just want to try something new, gluten-free zebra cakes can be just as delicious and moist as the traditional version. Plus, the zebra pattern is sure to impress any crowd, gluten-free or not!
Mini Zebra Cakes
If you’re hosting a party or want a fun treat for kids, try making mini zebra cakes. Bake the batter in muffin tins or individual cake pans to create bite-sized versions of the traditional zebra cake. These mini cakes are perfect for portion control and can be easily served at events like weddings, picnics, or casual get-togethers.
Mini zebra cakes are also easier to decorate, so you can get creative with different frostings, toppings, or even personalizing each one for a unique touch. They’re an excellent option for anyone looking to create an adorable, individual-sized dessert.
Tips for Perfecting Your Zebra Cake

Achieving the Best Zebra Pattern
One of the most exciting parts of making zebra cakes is getting that stunning pattern just right. To ensure your zebra stripes come out crisp and clear, it’s important to pay attention to how you layer the batters. First, make sure the batters are equally thick. If one is too runny, it might spread too much, causing the layers to blend.
When you add the batter to the pan, use a spoon to drop alternating dollops of chocolate and vanilla batter in the center of the pan. Let the batter spread naturally—don’t try to move it around too much. The key here is to let gravity work its magic. If you spread the batter too much or try to manipulate the layers, the pattern can get muddled. Therefore, patience is essential.
Ensuring Moisture and Tenderness
For a perfectly moist and tender zebra cake, it’s important to use ingredients that add moisture. Sour cream, buttermilk, and yogurt are excellent choices to achieve this. These ingredients not only keep the cake moist but also help to improve its texture. When combined with the right mixing technique, they ensure the cake has a soft, delicate crumb.
Another tip is to avoid overbaking the cake. Even though your cake might look done on the outside, it’s important to check for doneness with a toothpick. If it comes out clean, you’re good to go. If you overbake the cake, it can become dry. In addition, once the cakes are out of the oven, let them cool completely before frosting. Frosting a warm cake will melt the frosting, making a mess.
Decorating with Precision
When it comes to decorating your zebra cake, precision is key. First, make sure your cake layers are completely level. You can use a serrated knife to trim any uneven tops, ensuring the cake layers are perfectly flat. This will help your frosting go on smoothly and look even.
Next, don’t rush when applying frosting. Apply a crumb coat first—this is a thin layer of frosting that traps any loose crumbs. After it sets in the fridge, apply your final layer of frosting. This ensures a smooth and professional-looking finish. If you want to add extra decoration, like piping or fondant accents, be sure to do this after the frosting has firmed up. With these tips, your zebra cake will look as good as it tastes!
Nutritional Information and Serving Suggestions
Caloric Content and Macronutrients
While zebra cakes are undoubtedly delicious, it’s important to keep in mind that they’re a treat best enjoyed in moderation. A typical slice of zebra cake contains around 440 calories, with a balance of carbohydrates, fats, and proteins. Of course, the exact nutritional content can vary based on the recipe and portion sizes, especially if you add extra layers of frosting or decorative toppings.
The cake’s main ingredients, like flour and sugar, provide the energy your body needs. However, it’s the butter, eggs, and frosting that give the cake its rich flavor. While zebra cakes aren’t necessarily “healthy,” they’re a satisfying indulgence that’s perfect for special occasions.
Pairing with Beverages
Zebra cakes are versatile when it comes to beverage pairings. On the one hand, a glass of cold milk is a classic match, complementing the sweetness and richness of the cake. If you prefer something a bit more adult, consider pairing zebra cakes with coffee or tea. The bitterness of these beverages can balance the sweetness of the cake, making each bite even more enjoyable.
For a fun twist, serve zebra cake alongside a scoop of vanilla ice cream or a dollop of whipped cream. This adds an extra layer of indulgence and is sure to satisfy anyone’s sweet tooth. On the other hand, if you’re looking for a lighter option, you can skip the ice cream and go for a hot beverage like a chai latte to add a bit of spice to the flavor combination.
Storage Recommendations
After enjoying your zebra cake, you might have leftovers. Fortunately, this cake stores well. Keep it in an airtight container at room temperature for up to two days. If you want to keep it fresh longer, store it in the refrigerator for up to a week. Be sure to let the cake come to room temperature before serving, as cold cake can sometimes feel dense.
If you’ve made more than you can eat in a week, zebra cake can be frozen. Simply wrap individual slices in plastic wrap, followed by foil, and freeze them for up to three months. When you’re ready to enjoy, just let the cake thaw at room temperature, and it will taste just as fresh as the day it was made.
Frequently Asked Questions
Can I Use Boxed Cake Mix for Zebra Cake?
Yes, you can absolutely use a boxed cake mix to make zebra cakes. Many bakers opt for boxed mixes because they are quick and convenient, yet still deliver a delicious result. Simply follow the instructions on the box for making the batter, then divide it into two portions—one for the chocolate batter and the other for the vanilla batter. Add cocoa powder to the chocolate batter and proceed with the zebra layering technique as usual.
Using a boxed cake mix doesn’t mean you’re sacrificing quality; it’s a great option for anyone who wants to make zebra cakes with less effort but still achieve a delicious result. If you’re looking for a shortcut or need to save time, boxed cake mixes are a perfect choice!
How Do I Prevent the Batters from Mixing?
Preventing the chocolate and vanilla batters from mixing is the trickiest part of making zebra cakes. The key is to avoid overmixing the batters once they’re combined. When you add each spoonful of batter to the pan, drop it gently in the center, one on top of the other. The batter will naturally spread out, creating distinct layers.
Also, be sure to use a spoon to add the batter, not a spatula or whisk, which could mix the batters. Allow the batter to spread on its own. If you try to spread it with a tool, you risk blending the colors, which will result in a less dramatic zebra effect. So, be patient and let the layers form naturally.
Can I Make Zebra Cake Ahead of Time?
Absolutely! Zebra cakes can be made ahead of time and stored in an airtight container. This makes them perfect for parties, potlucks, or when you want to prepare dessert a day or two before. If you’re making the cake in advance, be sure to frost it just before serving to keep the frosting fresh.
If you need to prepare the zebra cake even earlier, you can make the cake layers and freeze them. Then, simply defrost and frost the cake when you’re ready to serve. Zebra cakes freeze well, so you can prepare them ahead of time without worry!
For more delicious ideas, be sure to check out our other recipe articles on the website.